One of the most frequent questions that I am asked during an in-service on foot orthotics is: “What kind of casting do you prefer?”
I have given in-service presentations to many different groups: orthotic and prosthetic labs, podiatrists, physical therapists, and physiatrists–and yet this same question always comes up. Originally, sensing a biomechanics ambush, I would diplomatically begin my answer with: “What do you guys do here?”
Over time I realized that I was not being set up but, in fact, most practitioners are more than a little confused: caught between the theory of plaster slipper casts and the practicality of impression foams. I have been hesitant to write on this topic–as I know there are strong viewpoints–so instead, I will humbly offer some observations.
Gold Standard
The plaster slipper cast is the gold standard of casting methods. It was popularized in the 1960s as Root et al. were developing the field of lower-extremity biomechanics. At that time there was a refined understanding of foot function and orthotics. The emphasis was being shifted from general arch support to subtalar joint control. There were also significant changes in orthotic fabricating materials: cork, leather, and metal were being replaced by thermoplastics. All this new science required better ways to replicate foot shape.
Plaster casting is the optimum method of capturing the foot in subtalar joint neutral. It is done non-weight bearing with the patient lying either supine or prone, and thumb and index finger loading and controlling the fourth and fifth met heads. A good cast cannot be rushed, and the inside surface should reveal some of the lines of the skin. Specific anatomical points or areas in need of relief can be indicated in pencil. Marking calcaneal bisection is also helpful when forefoot posting is required. There is also a synthetic slipper “sock” on the market that mimics plaster without the delay or mess.
Functional Orthotics: Slipper Cast Best
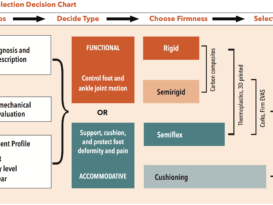
The slipper cast is particularly useful when you are designing functional foot orthotics. Their aim is to improve the biomechanical function of the foot. It is beneficial in applications such as sports orthotics, where precision is required in order to obtain maximum benefits. It is also good for flexible foot types, where weight bearing casts may only capture a fully pronated foot structure.
However, after two decades owning a custom foot orthotics lab, I have witnessed some pretty unusual things come through the door that are supposed to represent the shape of a foot. Thus, the first rule of plaster casting is: Make sure that the final cast is a true image of the patient’s foot. Being honest rather than academic will be more helpful to all involved. If you lack time, plaster splints, or technique, then it may be best to avoid the plaster slipper cast.
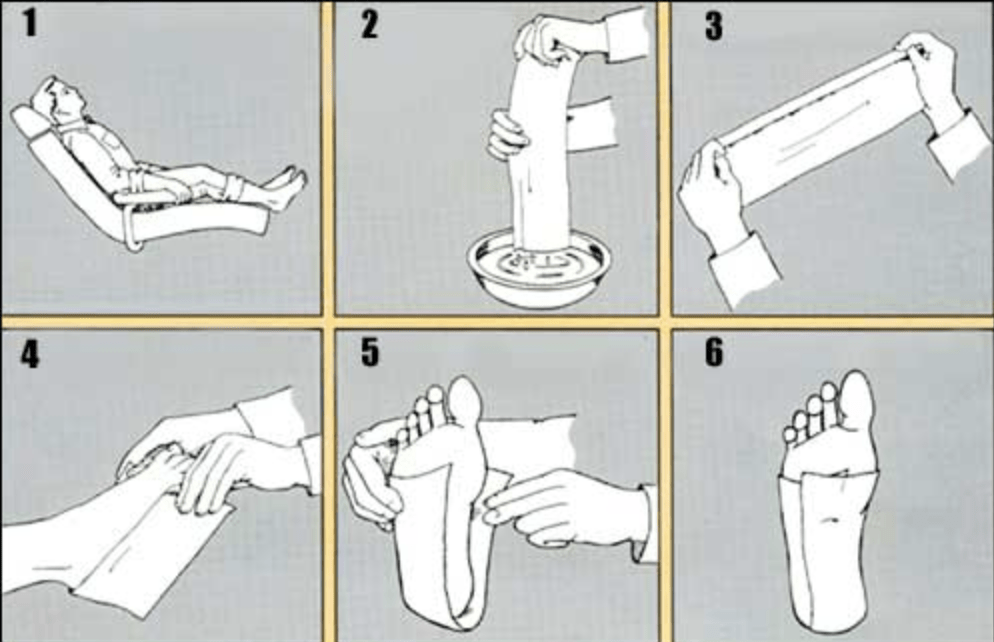
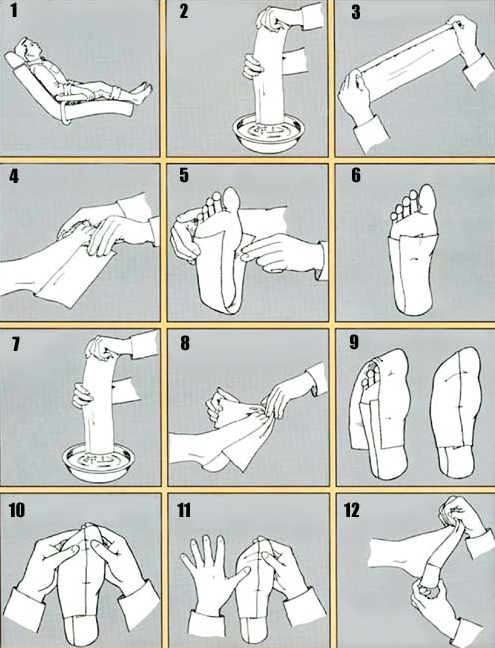
- Patient is seated comfortably.
- A 5″ x 30″ casting splint is recommended and used in these illustrations. Gently dip splint in tepid water and remove excess water with fingers. (Fold to 5″ x 15″ before dipping in water).
- Reinforce this splint by folding over about 3/4″ on one edge as shown.
- This splint is then applied approximately 3/8″ beneath the malleoli with the fold on the outside of the foot.
- The medial and lateral flaps are then folded over the plantar aspect of the foot.
- The remaining excess plaster is then pulled posteriorly and smoothed into place.
- Take another 5″ x 30″ splint and fold to 5″ x 15″ and repeat step #2.
- Apply the anterior splint overlapping it approximately 1/2 of the posterior splint, medially and laterally. Allow two fingers in front as shown for easier removal.
- Fold medial and lateral flap as in step #5.
- Smooth excess plaster on the plantar aspect and blend into sides. Bring excess splinting into web space as shown.
- Holding toes as shown, gently push foot back to slight resistance with thumb placed on 4th and 5th metatarsal head as shown. This will give you neutral position.
- After allowing cast to dry several minutes, gently pull it away from skin.
Now remove cast by pulling the heel portion off, then the front portion. Repeat steps 1 through 12 for the other foot.
Impression Foam: Quick, Clean
Impression foam casting has the obvious advantages of being both quicker and cleaner. It offers a good method of creating a negative of the patient’s foot. Approximately 65 percent of all casts that we receive are taken with impression foam. I usually recommend that practitioners take a semi-weight bearing cast when using foam. The patient should be seated in a chair with both feet plantigrade. It is important that the cast be taken slowly with the practitioner in control and guiding the descent of the foot. It is best not to take impressions on tiled floors as the box may slide halfway through the process. A good controlled cast will not crack or split the foam around the perimeter.
Best for Accommodative Molds
Impression foam is the method of choice when you are making accommodative foot molds. These orthotics are often designed to alleviate pain in a specific area of the foot. A semi-weight bearing or even weight bearing cast may often better capture the location of a bony prominence, callus, or fibrous tissue mass. Many practitioners use impression foam exclusively when dealing with restless patients, e.g. young children or people with certain disabilities.
Once the cast is complete, it is important to take a little time and care with the shipping. Plaster casts should be left out to cure and dry for 24 hours before being sent off. Otherwise they will tend to flatten and even dampen and potentially damage the shipping box. Although some impression foam is sold in boxes that are ready to ship, we recommend that you send them inside another box for better protection. On occasion, if the carrier is having a rough day, all that may arrive at the lab is a forensic jigsaw puzzle.
Results Are What Counts!
Using a results-oriented philosophy, you should carefully evaluate the outcomes and modify your approach accordingly. Regardless of the casting method employed, the goal is to deliver the best possible custom orthotics for your patients’ foot conditions. Satisfied clients generate referrals and repeat business–and that is valuable feedback worth working for.
Séamus Kennedy, BEng (Mech), CPed, is president and co-owner of Hersco Ortho Labs, New York. He can be contacted via e-mail at seamus@hersco.com or by visiting www.hersco.com.
