


Once again the rule of sociologist Vilfredo Pareto proves itself to be true. More popularly known as the 80/20 rule, when adapted to business, it simply states that 80 percent of your revenue will come from 20 percent of your clients. This certainly applies in the world of O&P, where practitioners may have to go from dealing with custom prosthetic patients to dispensing over-the-counter bunion splints.
I have heard many practitioners speak of the frustrations of having to cast and fit patients for custom foot orthotics (taking 80 percent of their time), when they would rather focus on what they do best: fabricating prostheses and helping rehabilitate patients (generating 80 percent of their revenue). Most practices today are multidisciplinary, so it is inevitable that you will be asked to deal with the full range of orthotic and prosthetic devices.
Casting, ordering, and dispensing custom foot orthotics can be a tricky business; not least because the patients have preset ideas about how their feet should feel and about the types of shoes that they should be able to wear. In order to make the procedure clearer, I have laid out some guidelines and tips. Hopefully, this will ensure that you can satisfy the patient’s needs right the first time every time, thus optimizing your own time.
 |
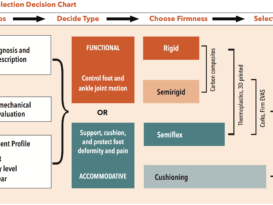
| Figure 1 Foot Orthotic Design Flowchart |
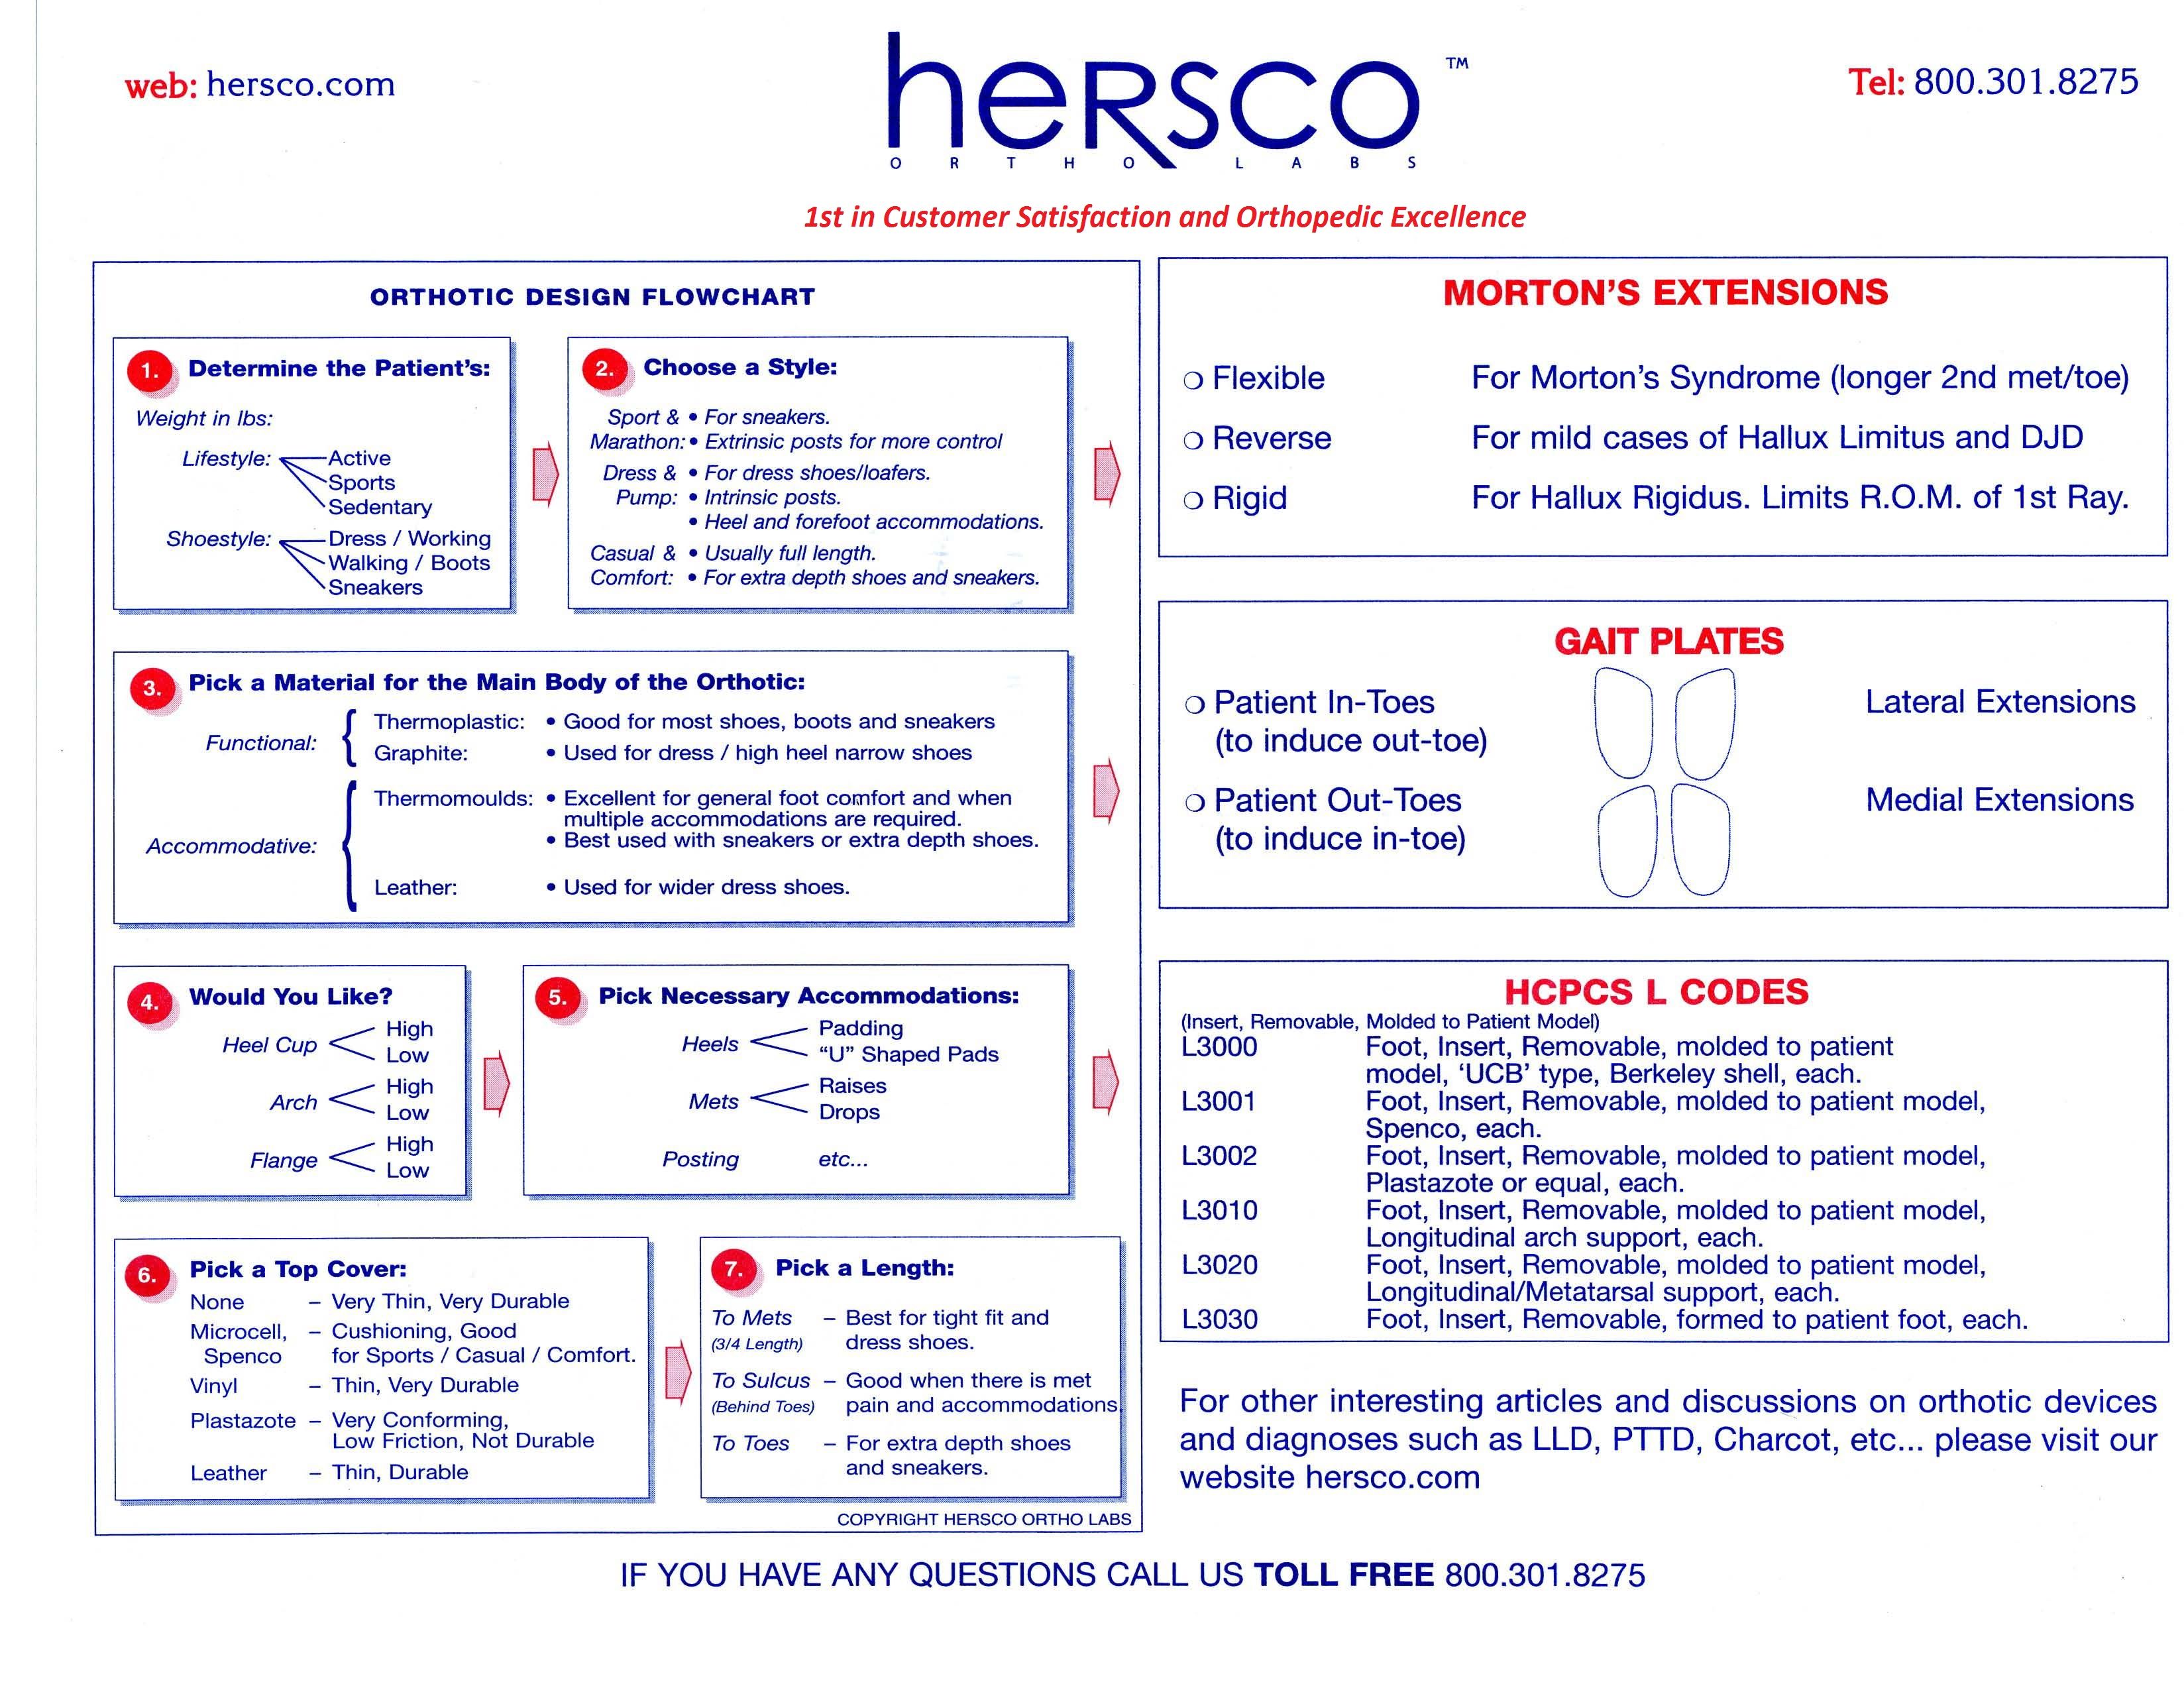
Over the years I have developed a flow chart that I have found useful in guiding me through the design process (Fig.1).
STEP BY STEP DESIGN
STEP 1: Although this first step has the least to do with a doctor’s prescription or biomechanical evaluation, the entire success of the orthotic may well depend on the patient’s weight, shoe style, and lifestyle.
The patient’s weight is a critical piece of information that the lab must have if it is to make the right material choices. For example, while 4mm Subortholen will be rigid for a 120-lb. granny, it will be positively flimsy for a 230-lb. construction worker.
The shoe styles that a person wears will determine the type of orthotic that will work for him or her. If the patient is a professional and experiences general foot pain on a daily basis, then the orthotics will need to fit dressier shoes. Likewise if the patient is an athlete and is using them strictly to prevent injuries during training, then the orthotic may only need to fit into a sneaker. However, don’t assume they always wear the shoes that they bring to your office: some patients will dress up or dress down for an appointment or on their day off.
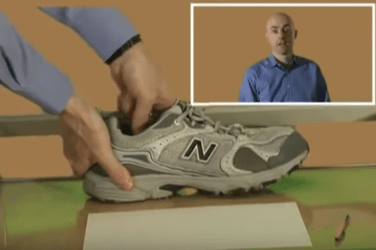
The first office visit may also be your best opportunity for patient shoe education. You can tell them the best types of shoes for their particular problem. Well-fitting shoes (both in length and width) with a firm counter, a reasonable heel height (1/2″1″), and a removable inlay will help to ensure the use and success of foot orthotics. I always advise patients to wait until they have their new orthotics before purchasing their next pair of shoes.
STEP 2: Choose the orthotic type based on the patient’s typical shoe style. Sports orthotics are usually extrinsically posted, providing more control for the rearfoot and the subtalar joint (STJ). Dress orthotics are intrinsically posted, allowing them to work in a wider variety of shoes.
In choosing a style, you are trying to find the optimum compromise between function and fit. For example, the slimmest designs (Pump Slenders, Cobras, Fashion Plates) will not offer much midfoot support, but they can be effective if the patient only requires forefoot corrections such as a met pad or a drop.
STEP 3: In general, foot orthotics fall into one of two broad categories. They are either functional: seeking to control the STJ and foot biomechanics, or they are accommodative: minimizing changes to foot function while providing relief and/or protection to specific areas of the foot.
Functional foot orthotics are usually made from thinner, firmer materials. Subortholen, polypropylene, copolymer, and the graphite composites are all good choices for functional devices. Usually they will incorporate a deep heel cup and a good medial longitudinal arch. Among other diagnoses, functional devices are used to treat pronation, plantar fasciitis, and heel spur syndrome.
Accommodative devices tend to be made from less rigid materials, such as EVA, Thermocork®, Neoprene, Plastazote®, etc. Although more bulky, they are usually molded to the entire plantar surface of the foot, providing more comfort. Accommodative orthotics are a good choice for patients with diabetes, rheumatoid arthritis, or Charcot neuropathy. In addition, they are often the better choice for patients who present with a rigid foot structure or limited range of motion, e.g. cavus foot type, clubfoot, or post-polio syndrome.
STEP 4: You can choose the degree of control an orthotic provides by varying heel cup depth, arch height, and flange height. Higher heel cups (>16mm) will control the range of motion in the heel and rearfoot. Arch heights can be adjusted at the lab by adding or subtracting plaster to the positive mold. Patients with flexible foot types will be better able to tolerate increased arch heights.
The flange is the medial wall that extends vertically to capture the midfoot and the navicular. Flanges were very popular when orthotics were called “arch supports,” and most devices were made from less rigid leather shells or cork. Flanges can still be useful for patients with extremely flexible pes planus and sometimes for those with posterior tibial dysfunction.
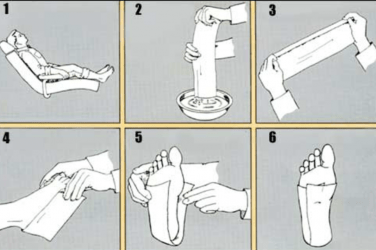
STEP 5: Drops, pads, cushions, posting, and lifts can all be included in the orthotic design. In order to facilitate correct placement, it is a good idea to actually mark the cast before sending it to the lab. Applying lipstick to the area of concern or taping felt to the foot will ensure that the correct location is noted on the negative cast.
There are a couple of points to consider when adding a lift to an orthotic. (1) Unless the patient is currently comfortably wearing a lift, it is often best not to add 100 percent of the lift height immediately. Try building it up gradually over two to three months, in stages of 50 percent, 75 percent, and then 100 percent. This will allow for a smoother break-in period. (2) If the lift exceeds 1/2″, it may be difficult to fit the device into regular shoes.
STEP 6: Top cover materials can be used to improve both the function and aesthetics of foot orthotics. In general, I prefer to go with thinner materials such as leather or vinyl, allowing the device to be transferred between more shoe styles. Many people will look for shock-absorbing characteristics, and they will favor Microcell, Sky, PPT, Spenco, etc. These work best if the footwear has removable inlays. Multicolored materials are often used for pediatric or sports-related applications to enhance their cosmetic appearance.
Closed-cell foams, such as Plastazote, offer the best protection for the at-risk diabetic foot. These materials reduce the shear forces and help prevent ulceration. However, they do tend to wear down more quickly and should be checked often and replaced before any bottoming-out occurs.
STEP 7: In choosing a length, I feel that less is better. This reduces the possibility of cramming the met heads or toes into the shoe. If the orthotic is primarily for STJ and midfoot control, there should be no need to extend it beyond the met heads (3/4 length), unless there is ample room in the shoe both across the ball of the foot and in the toe box. You can often test for shoe fit by having patients try on a set of prefab insoles while they are in your facility.
Casting, designing, and dispensing foot orthotics can be a tricky business. You are always trying to find the right blend of science and art to make the best device that will work and be effective. Clear communication with patients will also help them set realistic expectations. Hopefully you have picked up some ideas that will ensure more successful outcomes and reduced headaches. After all, Signor Pareto’s 80/20 rule doesn’t stop us from striving for 100-percent satisfaction!
Séamus Kennedy, BEng (Mech), CPed, is president and co-owner of Hersco Ortho Labs, New York. He can be contacted via e-mail at seamus@hersco.com or by visiting www.hersco.com